Lazy sourdough
[Update 2016-02-13: Old version with details after the jump. Experience has shown that the following is the essence.]
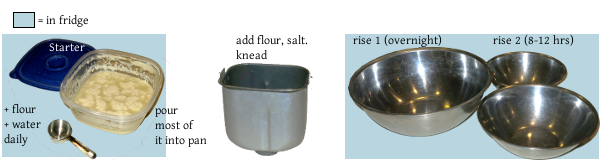
- Starter has had some flour and water added to it daily. Enough flour to feed the yeast — one or two handfuls — and enough water to keep it at a batter-like consistency. Really, no need to measure anything. Store in fridge the whole time.
- Pour most of the starter into bread machine pan for kneading. (Reserving maybe a cupful for continuing starter.) Add only enough flour to keep dough from coating the sides. Add a scant teaspoonful of salt per loaf. Knead for 10-15 minutes, let rest 20 min, knead for another 10-15 min.
- Invert into bowl, cover, and let rise overnight.
- Invert onto floured surface, shape into loaf or loaves (see detailed post after the jump), invert into airy forms that will allow surface to dry enough to form a toughish outer layer. (That last is the part I didn’t know before and which is crucial to making loaves that don’t pancake out.) The eventual bottom of the loaf faces up at this point. Let rise for 6-8 hours in fridge.
- Invert onto floured surface, score top with sharp greased knife, slide into superhot 500°F oven, and bake (see detailed post).
[Updated 2015-04-13, esp. regarding quantities, in boxed summary below.]
Have you looked at instructions for making sourdough bread and said to yourself “They have got to be kidding”? You know the stuff I mean. Add increasing amounts of flour at precisely 18-hour intervals while maintaining temperature at exactly 87°F and humidity at 73%. Plus, the increasing amounts of flour involved requires throwing out astonishing quantities of dough unless you plan to move to a hotel to make room for the bread.
Admittedly, they do have a reason for all this. The idea is to prevent nasty-tasting yeasts and bacteria from taking over your dough. But for me the complexity is overwhelming and I don’t bother to start. Well, then the bad yeasts have won anyway, haven’t they?
So here’s what I did which has been working rather well. The Lazy Blighter’s No-fuss, No-muss, No-waste Sourdough Breadworks:
Summary of breadmaking.
(Starter and other details discussed below)
(1 cup = 236ml, i.e. think in terms of 250ml)
Equipment:
♦ 3 quart / 3 liter container for starter.
♦ 1 large and 2 somewhat smaller mixing bowls to hold dough while rising.
♦ Bread machine or plenty of perseverance for kneading.
For baking: Pizza stones or ♦unglazed ceramic floor tiles, ♦metal pan on the bottom onto which you can throw ice water, ♦surface for sliding loaf into the oven.
Day 1
♦ About 2 liters or quarts total starter, pour off most of it into a bread machine. Use 3 cups starter for dough. Reserve remainder for continuing starter, and add about 1/4 cup flour, 1/4 water to this starter.
(Reserve about a cupful and add some flour and water. It’s your new starter.)
♦Add about 2 cups flour. Add about 2 (maybe 3) teaspooons of salt (10 ml or a bit less). During kneading, if necessary, carefully add in small amounts of water so that the dough ball ends up just barely sticking to the sides. This means it sticks more early on, because the flour absorbs water throughout the kneading and resting. Knead for about 20 minutes. Let rest for about 30 min. (The resting lets the flour to hydrate better.) Knead again for about 20 min.
♦ Turn over into large floured bowl, cover lightly, rise overnight in fridge.
Day 2
♦ Turn over onto floured board, gently divide into two or more loaves and shape. Put bottom side up into floured bowls, cover lightly, and let rise for 6-8 hours at warm room temp or overnight in fridge.
(Possibly Day 3)
♦ Heat oven to 500°F (260°C). Pizza stones or ceramic floor tiles are in there waiting for the dough. Once at temperature, wait another 20-30 min to make sure tiles are equally hot.
♦ Invert dough-loaf onto something smooth, flat and floured (e.g. rimless cookie sheet), and slide loaf onto tile. Try not to burn yourself.
♦ Throw a cup of ice cubes + water into the pan at the bottom of the oven. Repeat five minutes later.
♦ Bake for 35-40, or even 50 minutes, but take out before the crust burns. Turn heat down to 450°F after first 15 min, if desired.
♦ Cool before slicing.
Getting the starter started is the iffiest part of the whole process, as far as I can tell. The wild yeasts you want are on the surfaces of grains and in the air around you. A very small grain with lots of surface area is Ethiopian teff. I got teff flour at a health food store (it’s even on Amazon), and mixed about half a cup with a cup of white all-purpose flour and another cup of wholewheat all-purpose flour. (Freshly ground wholewheat flour would also have lots of yeasts. Or just use plain old whole wheat. Yeasts are everywhere. If you use only white flour, the surface of the grain has been removed and you’re starting with the least possible “good” yeast.) I kept it in a warm place and added a bunch (maybe half a cup to a cup) of white or wholewheat flour to it once a day or when I remembered. Add enough water each time to keep the whole thing at a sort of pancake-batter-like consistency.
It was horrible.
I threw that out and started over. I kept the mixture warmer this time by putting it inside the oven with just the oven light on. After a week or two, it smelled nice and yeasty-bready and seemed worth trying to make bread out of. I don’t know whether the higher temperature made a difference or it was just the luck of the draw. I suspect the latter.
Keep starter in a large covered container in fridge. It starts small — a cup or two in volume — but you stir in a bit (about 60 ml or 4 tbsp) 1/4 cup of flour every day, plus enough water to keep it batter-like, about 1/4 cup each time. This means it acquires volume. As the volume increases, add somewhat larger quantities of flour and water, as the spirit moves you. Don’t add salt to starter! Salt depresses yeast. Add salt only to bread dough after your continuing starter has been separated from the batch. You can always add more flour to the starter. If, for instance, you plan to make loaves soon and don’t have enough volume of starter, just add a whole cup or two of flour for a couple of days, plus as much water as needed. You can bulk it up quite quickly.
Once I had the starter, I followed some pro tips from The Bread Board, an Oregon bakery that makes divine bread. They do really long fermentations and keep everything cold, never warm. Everything is held in the refrigerator. That runs counter to just about all the other instructions I saw on the web and in books, but, dammit, it works. That really improved the flavor and the activity of the yeast. It also means you can be very cavalier about time. Don’t have time to use that bread dough today? No worries. It’ll be fine in the fridge tomorrow.
The actual breadmaking is where I really deviate from accepted practice. You’re supposed to reserve some of the starter for the next batch, use two cups for the loaves you’re making, and throw the rest out. The concept of throwing out masses of dough in a world full of people living on a dollar a day just strikes me as Wrong. Yes, I know there’s no way to ship my messy bread batter to anyone who needs it. But it feels wrong anyway. So I don’t do that. I reserve a bunch of starter (about 1 to 2 cups’ worth) and pour the rest into a bread machine pan.
About the bread machine. I know I’m being impure. But my earlier attempts all wound up being dwarf bread. (“Rock-hard, never goes stale, and is terribly sustaining. A traveller can go for miles, just knowing there’s dwarf bread in their pack. … Various forms of dwarf bread can be used as weapons, e.g. battle muffins and drop scones.”) Some noodling around on the web indicated this might be due to insufficient kneading. So I tried a lot more kneading in a bread machine on the “dough” setting. Worked like magic.
There’s a nice video showing the whole process done right (i.e. manually) here. He doesn’t show the shaping process that much, so there’s another link below specifically for that. The only misleading part is that he makes the kneading look easy.
The starter, remember, is like pancake batter. So once it’s poured into the bread machine pan (or large mixing bowl if you’re kneading manually), I added only flour. No water. Better to err on the side of too little flour, say about 2 cups(?) to the approximately 6 cups (1.5 qts) 3 cups poured in, because you can always sprinkle in more later if the dough is still too sticky. The salt is sprinkled on top. As I say, check on it as the machine trundles and add pinches of flour as needed. Total kneading time by machine is about 1/2 an hour. If kneading manually, it’s a slow process and the flour probably hydrates sufficiently as you work. With a machine, it’s a good idea to stop it after 15-20 minutes and let the dough rest for a while, say half an hour, so the flour can absorb more of the water. That reduces the stickiness quite a bit without adding more flour.
You’ll notice the recurring theme of avoiding too much flour. Too much results in dwarf bread.
After kneading, turn the dough ball over into a large floured bowl and put in the fridge. It should approximately double in size before making loaves out of it. That takes 12-24 hours.
Turn over onto floured board or surface, cut into pieces of the right size for the size loaves you want, and shape. (Most relevant bit at about 1:30 mark.) Shaping is tricky and critical. The gluten (=proteins) in the wheat is what forms ribbons that trap the gases formed by the yeast. The idea is to stretch them so they wrap around the bread and do a good trapping job. You flatten the ball a bit, pull and fold the edges inward, and repeat a few times. You do *not* knead the bread at this point. You want to retain as much fluffiness as you can.
Put into floured bowls for the last rise with the messy bottom bit facing up. When they’re turned over and slid into the oven, that’ll be the bottom. Cover and put in fridge to rise for 12-24 hours. If you need to hurry the process, you can put them in a warm place and they’ll rise in a few hours. The bread’ll still taste good, but maybe not quite as good. The long rise times is what develops the flavor.
Then comes the exciting part, the baking. Hellishly hot temperatures are essential and you could wind up with burns that land you in the emergency room. Don’t do that. Wear long oven mitts. Be careful.
Some kind of stoneware for the bread to bake on is essential. It needs to be something so heat-retentive that when you plop down a blob of cold dough, it stays super-hot regardless. What that does is rapidly heat the gases trapped inside the bread and force them to expand. It’s called “oven spring” and it’s the main factor in creating bread with good chewy texture. You can buy official pizza stones for this purpose. They cost on the order of $20 – $40 or even more. Or you can go to a building supply store (in the US, Lowe’s or Home Depot) and buy unglazed ceramic floor tiles. Mine cost $1.43 for the square foot size. I use two. (Update: just like the official kind, these sometimes crack. Replace as needed.)
Preheat the oven to 500°F (260°C), and then wait another 20-30 minutes to be sure the stones are equally hot.
Turn the raised loaves out of the bowls onto a floured smooth surface. I have rimless aluminum cookie sheets that work very well for this purpose. A cutting board would work too, I expect. Cut approximately half-inch (centimeter) deep lines into the top of the loaf in any pattern that suits you. This breaks the drier skin on the surface of the loaf and allows it to rise fast during oven spring. Without the cuts the bread usually bursts along the sides, which is not good.
As soon as you’ve made the cuts, open the oven, shove the doughy loaf onto a stone, and close the oven. Do the same with the next loaf. Then throw in a cup of water full of ice cubes. (The result is rather spectacular. Don’t be shocked.) Do that again in five minutes. These shots of ice water are essential to keep the crust from getting too tough.
After 35-40 min, bread is baked. My rule of thumb is take it out before the crust starts scorching. I don’t know how to tell when it’s actually done (that is, without an official baking thermometer in the bread, which I don’t have).
While all this is going on, your place fills with baking smells. I always wind up taking slices off the end of the loaf as soon as it’s not fiery hot. That’s too soon. But worth it. Don’t wrap it until it’s cooled for several hours.